SP model import issue + solution

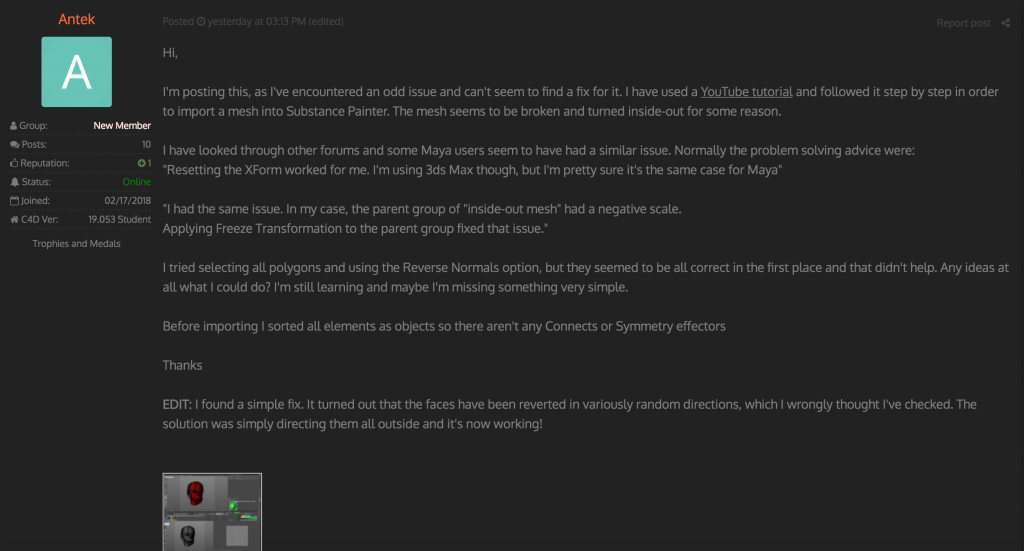
Being in the process of creating the models, as I’ve mentioned, I’m also preparing myself for the texturing part.  I followed a YouTube tutorial on how to import a model from Cinema 4D into Substance Painter by using colour maps, but it came out “inside out”. The ears and the hair seemed to be fine, but the face was incorrect. In order to find a solution, I’ve googled the problem hoping that someone had a similar situation. I found some users describing the same problem, but the solutions suggested to them were dedicated to other 3D software like Maya or 3ds Max.

I’ve decided to use the C4D Cafe forum, which was a great help in the past, and described my problem including the screenshots:

Zrzut ekranu 2018-03-16 o 18.00.47

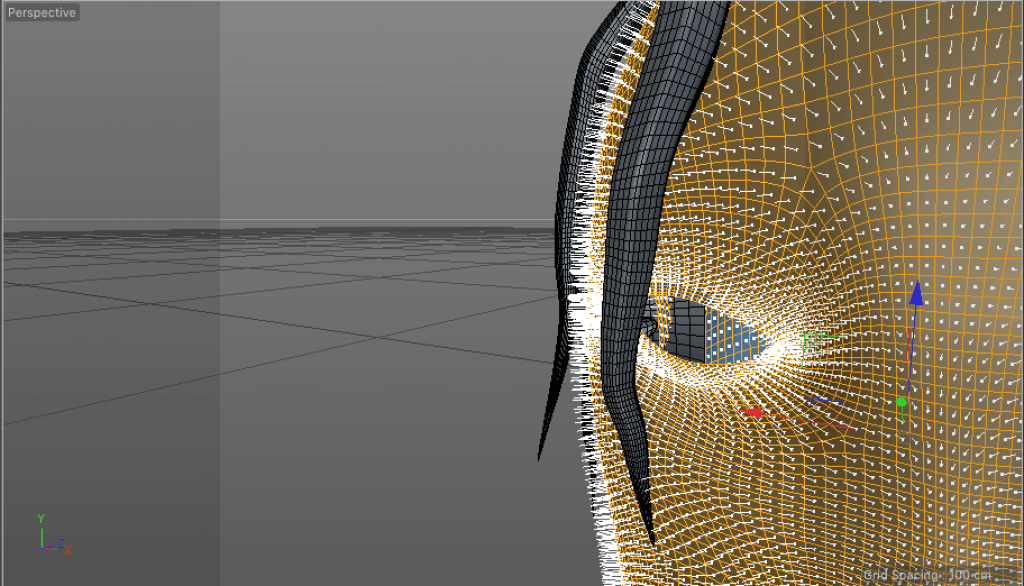
I haven’t got any replies after a day, so it seemed like I must have missed something obvious. I checked my mesh again, this time very carefully and I found out that some of the normal were facing the inside of the model. I flipped them around and it finally worked. Just to clarify, I also edited the forum post in order to possibly help someone looking for the same topic in the future.

Below is the image of how the faces should be adjusted. The lines coming out from the center of the polygons point in the right direction. There’s a very short video made by MAXON, explaining how to fix the faces when many of them are pointing in the wrong direction.

Zrzut ekranu 2018-03-16 o 15.13.48

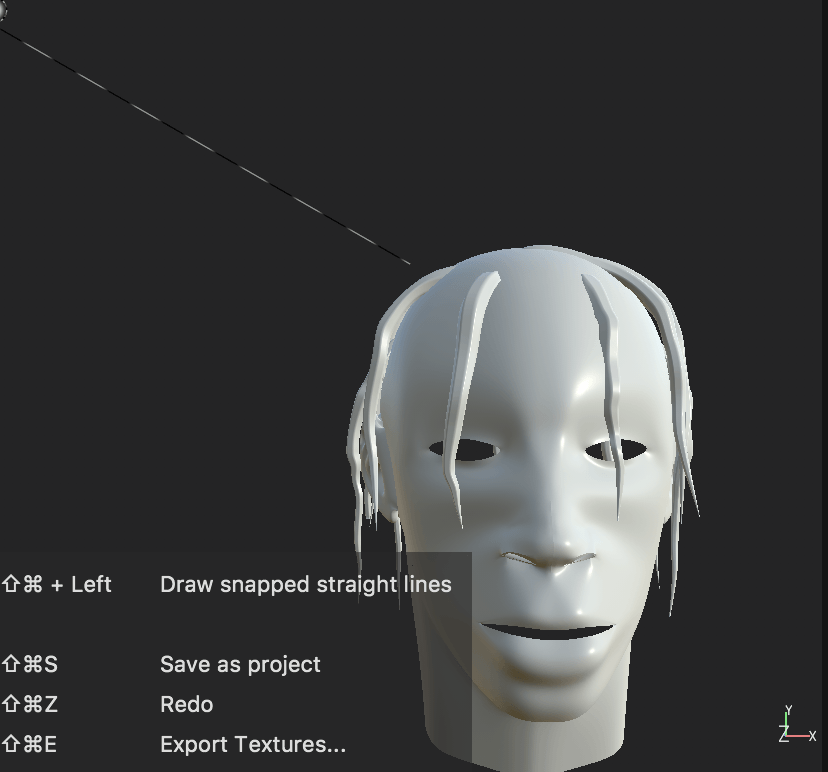
Model imported into Substance Painter:

Zrzut ekranu 2018-03-16 o 16.06.31

Introduction to UV Mapping theory

As I’m carrying on with the creation of 3D models, it is time to also prepare for texturing/creating materials. I have started my research with the most essential element that every 3D modeller should be aware of – UV mapping. Creative Bloq prepared a great introductory article about it and I will make a breakdown of what I’ve learned from it. Many fragments of this post are copied segments of the original article:

UV map – flattened topology of the model and basis for map bakes

UV space – based on a 0 to 1 grid, with 0.5 as the middle coordinates, a UV map consists of your 3D model’s XYZ coordinates flattened into 2D UVW space – or tile, as it’s called.

Depending on your modeller and mapper, 3D’s horizontal X-axis equals U in 2D space, vertical Y equals V, and the depth coordinate Z equals W. There is no madness to the letters, only method: 2D’s UVW is used solely to avoid confusion with 3D’s X, Y and Z (3D translated to flattened 2D).

Available in some renderers: UDIM – U-Dimension. In simple terms, UDIM makes UV mapping and texturing easier by enabling you to create multiple UV grids for the same model by allowing you to have 10 tiles on the U-axis, and an (almost) infinite amount on the V-axis.

UV mapping shouldn’t be distorted – scale and size are very important.

Normal map is often wrongly considered as a glorified bump map, which isn’t correct (it has more functions than height and depth maps).

The direction they face defines the direction of smoothing, and the side or direction your materials display on. For example, if you’re creating a scene inside a box, it would be natural to have the texture on the box’s inner walls face inward, not outward, so you can see it.

A smoothing group’s function is to make your model appear smoother without adding polys to the mesh. It’s a sort of pseudo-subdivision surface where if two or more polygons share an edge and are members of the same smoothing group, they will render as a smooth surface.

.fbx export results with with tangents and binormals checked, but it also helps to use multiple, non-flipped UV maps or sets, at the cost of load and the convenience of having everything in one map.

If you’re absolutely stumped as to where to begin unwrapping, look at your model, and, if you haven’t already, divide it into groups or material groups. Then go for the largest, or most complex items first. These areas are often the most visible and time-consuming parts of your UV map and texturing, and it’s here you’ll have the least leeway when it comes to time and errors.

Complete owl model

Today I have finally completed the owl model. I could surely tweak some elements and apply improvements, nevertheless, I have to move on with the next objects as this one required more time than expected and I need to make sure that all elements of my project are finished so I have some extra time for the layout and document design.

I added the legs and made the shape of the body a bit more graceful as the finishing touches. I encountered one problem, but quickly found the solution and fixed it. When extruding, some of the faces went in opposite directions. It turned out I had to use a reverse tool which instantly worked out.

Zrzut ekranu 2018-03-08 o 12.55.45

Using a great free asset called Studio Box, I copied the model and applied a basic, glossy material just to present it. Exported images have been opened in Lightroom for additional adjustments:

Owl Final 2

Owl Final 1

The last stage of the model presentation was uploading it to Sketchfab, providing a complete insight: https://sketchfab.com/models/e67e50659f9c459682344676162ca7db

Contacting Mark Rubbo

In one of the past posts, I have mentioned the 3D head model which became an inspiration for the direction of my artwork. I incorrectly stated that it was made by Timothy Saccenti. He was indeed involved in the project, but mainly in the photography. The author of the model was in fact a very talented artist called Mark Rubbo, whom I’ve contacted and asked if he would be willing to give me some feedback on the project when I reach a bit more advanced stage of it. He agreed and asked me to show some of my portfolio. Here’s his reply:

Zrzut ekranu 2018-03-05 o 13.02.30

He gave me an extremely interesting idea of translating my 2D art style (https://www.instagram.com/anntuuan/)  into 3D, which I will definitely consider in the near future. He also suggested using Octane and Redshift, but my current hardware wouldn’t be able to handle those engines unfortunately. Mark also said that the Travis Scott model looks promising, which means I’m on the right track with it.

Visit Mark’s website as some of his work could be an inspiration for others: http://www.markrubbo.com/

Progress update – Storyline, Owl 3D model

I haven’t been posting much, but I was very busy with various aspects of my project. First of all, I have finally decided on what the chapters of my work will contain. They will be divided into sections named after the most important projects that Travis Scott created and will also include some interesting facts in small pieces of text. The most important mixtapes and albums that I will use as a guideline are: Owl Pharaoh, Days Before Rodeo, Rodeo, Birds in the Trap Sing McKnight, and upcoming album: Astroworld. They will be divided into 5 double spreadsheets giving me enough space to present both story and artwork.

I have decided on what 3D model I will include in the first chapter: an owl and a glass pyramid. Owl Pharaoh was a crucial step in Travis Scott’s career as it was noticed by Kanye West and T.I. opening his way to the top tier Hip-Hop scene. The title of the mixtape is rather mysterious, but I wanted to present an obvious representation of the name in, but in a unique style, as some of the audience might not be very familiar with this early project.

Modeling an owl was a challenge, as I didn’t have any tutorials available. Unlike in the case of the 3D head model, I had to follow my instinct without helpful resources. I was also struggling with a really accurate reference for an owl, but I finally found a perfect template. The process itself started with the wing. I created one feather and kept repeating it as the guidelines followed. Clone Effector seems a more efficient solution, but I was slightly scaling some of the feathers up and down to avoid too much of a repetition. After making 2 layers of feathers, I created an arm structure by extruding plains. The owl presented in the image wasn’t the species I was looking for, as artists representing the album normally use a horned owl. I decided to see the topology constructed by other 3D artists. There was one particular model which turned out to be really helpful, in the body mesh creation. The human head model turned out to be super useful, as I approached the owl in a similar fashion, starting with a plain shaping up for a beak and the eyes. After that, I played around with some basic materials and light to see how the model could be presented. I’m yet to construct the legs and the pyramid, but that will be the easiest part.

It’s important to note that there’s a special Feather tool within Cinema 4D for realistic feathers, and it would definitely be useful, but in case of this model, realism wasn’t the main priority.

Zrzut ekranu 2018-03-03 o 20.50.26 Zrzut ekranu 2018-03-03 o 23.36.10 Zrzut ekranu 2018-03-04 o 00.27.05 Zrzut ekranu 2018-03-04 o 01.27.25 Zrzut ekranu 2018-03-04 o 15.40.10 Zrzut ekranu 2018-03-04 o 15.40.30

owl2 owl