Fundamentals revision with examples #1 – Spline Modeling

Before entering the last week of my project development and summing up what I have learned, I decided to go through tutorials explaining different fundamental techniques of modeling. Spline modeling was the first one.

Spline Modeling:

– Non-uniform objects

– Organic shaped objects

– Advanced base objects

Using 3D spline to create NURBS-object

Zrzut ekranu 2017-12-03 o 23.13.21

NURB – Non Uniform Rational B-Spline

Zrzut ekranu 2017-12-03 o 23.25.45

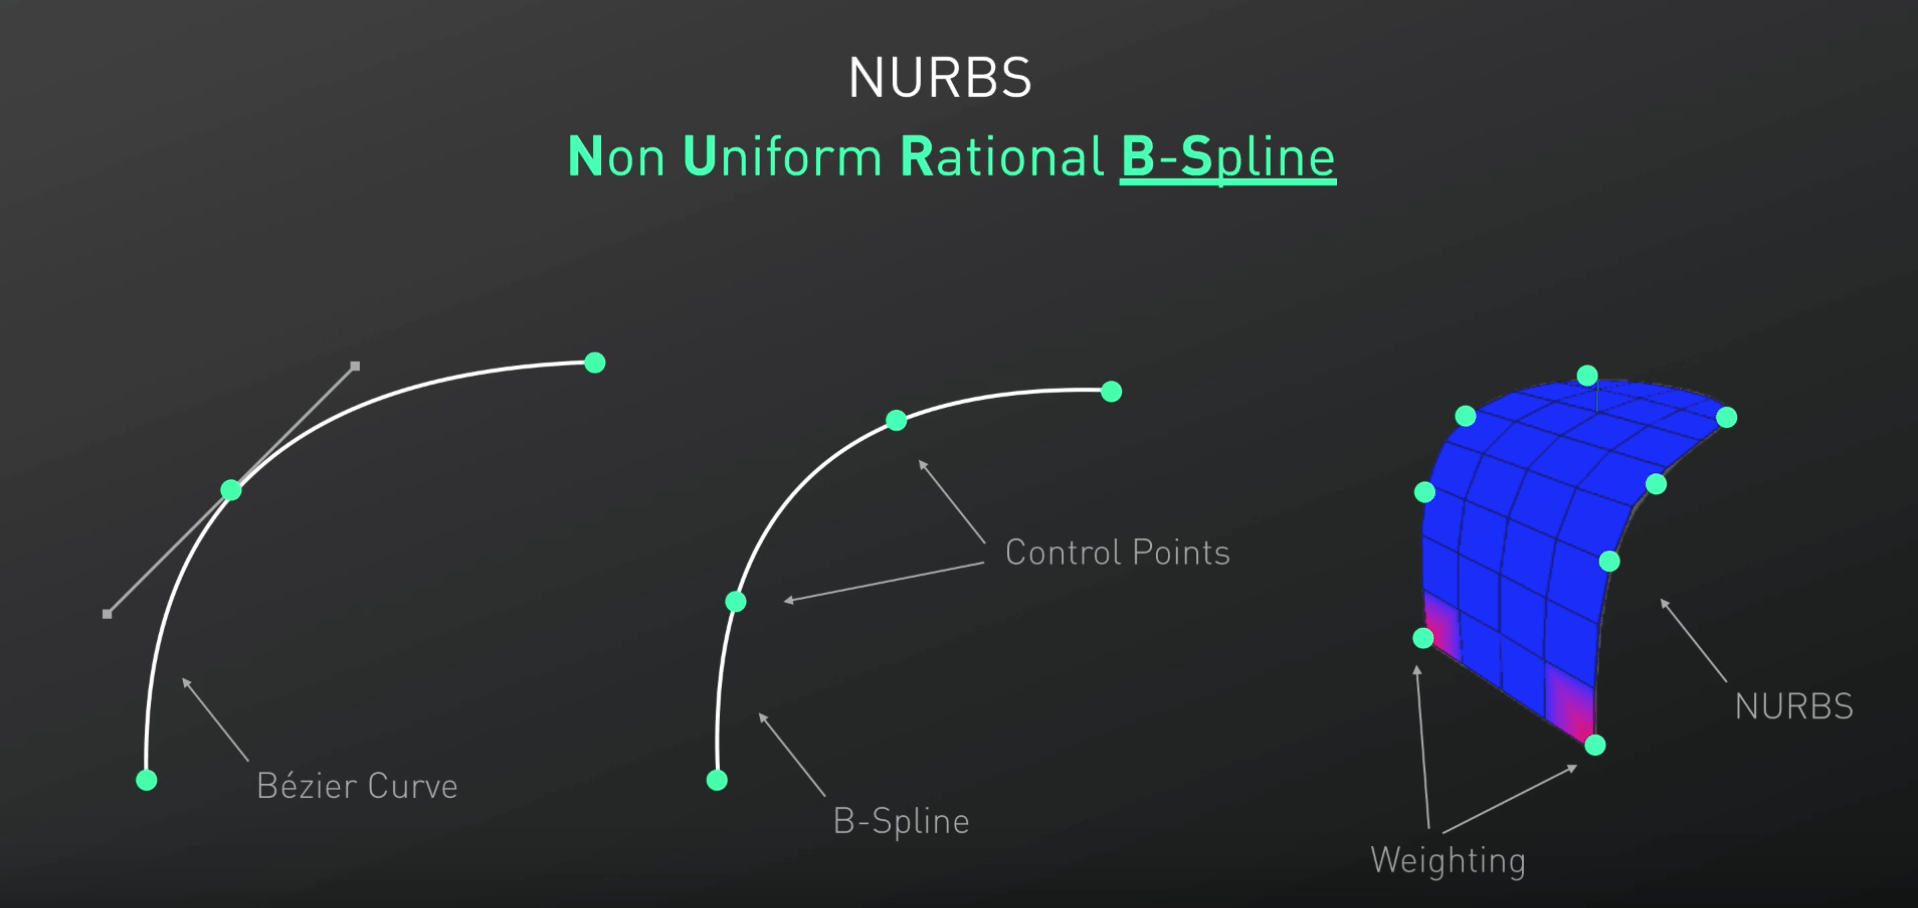
It’s important to understand B-Splines in order to understand sub-division modeling.

When we use the B-Splines, it’s essential to use one of the side views or the front view.

Control points in the B-spline are not integrated with the spline (difference between Bezier and B-Spline).

First practice: Using the Line Cut tool (in tutorial a “Knife Tool” is being used, but it seems to be an older version of Line Cut), I added two points to a perfect 90 degree corner. When I then changed the spline type from Linear to B-spline, the points created a rounded angle.

Zrzut ekranu 2017-12-03 o 23.44.48

When the edge is hard and we want a more subtle transition between the points, we can right click and select “Soft Interpolation”

Zrzut ekranu 2017-12-03 o 23.53.51Zrzut ekranu 2017-12-03 o 23.54.22

We can also right click and select “Equal Tangent Length”.

Zrzut ekranu 2017-12-04 o 00.00.59Zrzut ekranu 2017-12-04 o 00.01.16

We can also use “Create Outline” to make a perfect outline of our spline:

Zrzut ekranu 2017-12-04 o 00.06.56

Zrzut ekranu 2017-12-04 o 00.08.15

You always have to make the splines children of the generators.

When we use the Extrude generator, we can still make the spline editable and move the points (or for example use the Line Cut and apply Soft Interpolation).

Zrzut ekranu 2017-12-04 o 00.21.49 Zrzut ekranu 2017-12-04 o 00.22.01 1Zrzut ekranu 2017-12-04 o 00.25.53

I have already used a Lathe tool in the past, but I felt that revision is necessary. First off, we have to make sure that the start point is perfectly positioned in the middle.

Zrzut ekranu 2017-12-04 o 00.30.17

We can then complete the half of the glass shape and give it some thickness by creating an outline. Adding the Lathe tool and making the spline a child of it will create a perfectly rounded shape. I thought it’s a good chance to create a composition connecting a few other tutorials.

Zrzut ekranu 2017-12-04 o 15.38.39Zrzut ekranu 2017-12-04 o 16.12.22wineglass

Apart from the wine glass shape made of the Lathe + Spline, I applied a gradient-based background and the Voronoi Fracture (with Time effector).

The last parts of the video focused on using Sweep, where we create one base shape (like a circle) and make it children of the Sweep with our spline. Then, it explained something I have already practiced in the Travis Scott head model (hair) – using the Loft to connect the splines.

Zrzut ekranu 2017-12-04 o 17.02.56

Round up:

Zrzut ekranu 2017-12-04 o 16.56.28

Tutorial + Own experiments – Crystal Ball

This tutorial explained how to create a low-poly crystal ball with a transparent, luminant material. What I’ve learned and practiced:

– increasing the number of segments in a sphere + unchecking “render perfect” and the phong tag for a more primitive shape

– changing the sphere type into Icosahedron (segments shaped as triangles)

– applying polygon reduction

– applying displacer

I wasn’t sure how exactly displacer worked, so I used help within the software:

Displacement is similar to Bump, the difference being that here the object is actually (not just apparently) deformed. This difference is best seen at object edges.

Zrzut ekranu 2017-12-01 o 11.32.50

The Displace Deformer shows the displacement object per object deformation in the editor view, and does not have to be rendered in order to make the effect visible.

The Displace Deformer functions as a deformation object and must therefore be made a child of the object to be deformed (or be in the same hierarchy, below a common parent object). Make sure the object to be deformed contains enough subdivisions.

Always disable the Perfect Sphere option when creating a sphere. Leaving this option enabled will prevent a displacement map from being calculated.

– adding noise as texture in shader to add some randomness

– adding GI in rendering settings + preset to Interior – Preview (High Diffuse depth)

– making glowing material with transparency —> refraction = 2 —>texture as fresnel + change gradient from black to grey

– adding luminance and make the texture a gradient, 2DV

In the tutorial, there was a HDRI rig used (which isn’t free) so instead of going for a studio like lighting, I wanted to get a bit more creative and add a few glowing objects, to make an interesting composition. I also added two light sources on the floor, to subtly light up the center object.

I made some additional cubes floating in the air. Firstly, I thought that using cloner + random effector will give the best results. Then I realized that I will be able to place them more precisely by just duplicating and moving around.

I have also edited the original material by changing the gradient colour, converting the type of gradient format to 2D – Box and adding turbulence, which makes the inside of the cube look a bit distorted and more natural.

Zrzut ekranu 2017-12-01 o 19.50.27 Zrzut ekranu 2017-12-01 o 19.49.25Zrzut ekranu 2017-12-01 o 19.49.04Crystal composition


I’m really happy with the outcome of those experiments and I’ve decided to always add my own tweaks to finished products from the tutorials.

Final result from the tutorial for comparison:

Zrzut ekranu 2017-12-01 o 20.16.14